
The beauty of making your own Alice in Wonderland decorations lies in the freedom to customize every element.
You can mix colors, sizes, and materials to match your personal style while staying true to the whimsical nature of the tale.
This guide shares 26 practical DIY decoration ideas that you can actually build with basic supplies.
Hand-Painted Teacup Wall Display
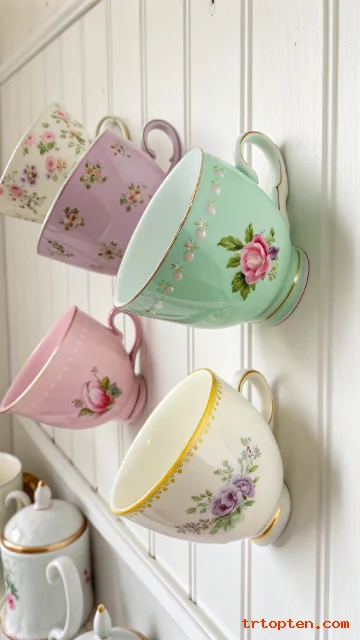
Hand-painted teacup wall arrangements create an instant focal point that screams Alice in Wonderland charm. You can collect mismatched teacups from thrift stores and paint them in pastels or bold colors that match your theme. Mount them on your wall at varying heights to create a dynamic, eye-catching display.
The painting process is straightforward and requires only basic acrylic paints and brushes. Use sealant spray to protect your designs from fading. Consider adding gold leaf or metallic accents to give your teacups a luxury appearance.
This wall display works perfectly above a console table, in a child’s room, or as a focal point in a living space. Guests will immediately recognize the teacup reference and appreciate the handmade touch. The display costs less than ten dollars for materials if you source your cups secondhand.
DIY Playing Card Garland
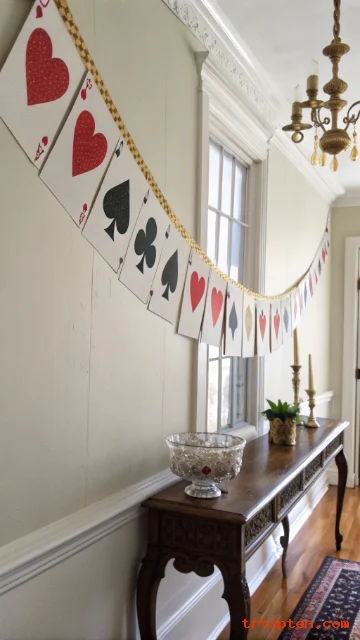
Playing cards make iconic decorations that instantly signal the Alice in Wonderland theme to anyone entering the room. Cut regular playing cards into heart, diamond, club, and spade shapes, then string them together with twine or ribbon. You can use real cards or print colored card designs on cardstock and laminate them for durability.
Create variations by painting the cards with metallic markers or adding glitter for extra sparkle. The garland hangs beautifully across doorways, above beds, or along party tables. You can make multiple garlands to layer and create a more dramatic effect.
This decoration takes less than thirty minutes to assemble once you’ve cut your cards. Kids can help with the stringing, making it a fun family activity. The finished garland costs practically nothing if you use old decks you no longer play with.
Cheshire Cat Hanging Decorations
The grinning Cheshire Cat demands a special place in your Alice in Wonderland décor setup. Make cat head decorations from paper plates, pink felt, and black markers to capture that iconic wide smile. String them from your ceiling at different lengths to create a floating effect that feels magical.
You can stuff paper bags with newspaper to create three-dimensional cat heads instead of flat versions. Paint or glue on purple eye patches, pink noses, and wide grins that seem to follow guests around the room. Add whiskers using string or yarn for extra personality.
These hanging cats work beautifully over party tables, along staircases, or clustered in room corners. The wobbly, uneven hanging creates movement and liveliness in your space. Making a dozen cats takes about two hours and costs under five dollars in supplies.
Teapot-Shaped Gift Boxes
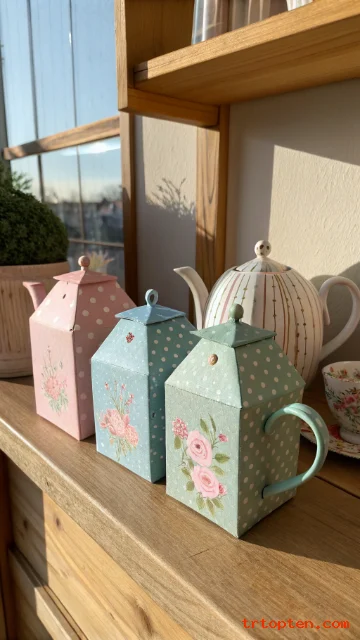
Transform plain cardboard boxes into whimsical teapot-shaped containers for storing small gifts or party favors. Draw teapot outlines on kraft boxes, then cut and fold them to create a three-dimensional effect. Paint them in bright pastels or classic white with decorative patterns.
Fill these boxes with treats, trinkets, or small gifts related to the Alice in Wonderland theme. The spout and handle construction makes them instantly recognizable without requiring advanced crafting skills. Kids can decorate the outside with stickers, stamps, or hand-drawn designs.
Stack these teapot boxes as a decorative display on shelves or side tables. They serve double duty as both decoration and practical storage solutions. Making a set of five takes about one hour and uses materials you likely have at home.
Queen of Hearts Playing Card Door Sign
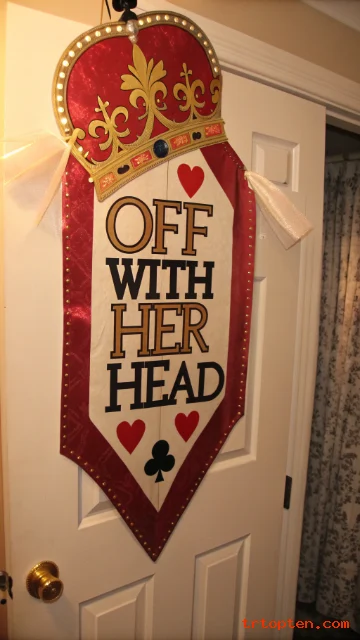
Create a bold Queen of Hearts sign to hang on your bedroom or bathroom door as a statement piece. Use red cardstock or construction paper to make a large playing card shape. Add a crown, royal symbol, and dramatic lettering that says “Off With Her Head” or any personal message.
The sign needs a thick cardboard backing to hold its shape when hanging from a ribbon or string. Use metallic markers, glitter glue, or paint pens to add details that catch light and draw attention. Make the lettering bold and easy to read from a distance.
Hang this sign prominently on your most impressive doorway to immediately establish the Alice in Wonderland aesthetic. The dramatic message makes guests smile and sets the whimsical tone for your space. This single decoration takes thirty minutes and makes a huge impact.
Mad Hatter Top Hat Centerpieces
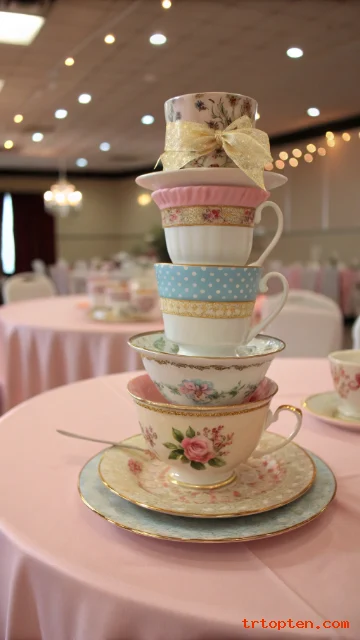
Stack teacups, saucers, and plates into impossible towers that look just like the Mad Hatter’s signature tall hats. Start with larger plates on the bottom and work your way up with progressively smaller cups and saucers. Secure each layer with museum putty or a safe adhesive.
Wrap ribbon or fabric strips around each “hat” to add color and stability. Add flowers, small toys, or decorative picks to the top for whimsical touches. You can paint the stacked pieces beforehand to create a unified color scheme.
These centerpieces work perfectly for party tables, shelf displays, or as conversation starters in any room. Each hat takes fifteen minutes to assemble once you gather your dishes. The beautiful part is you can quickly disassemble them when you need the dishes again.
Drink Me and Eat Me Labels
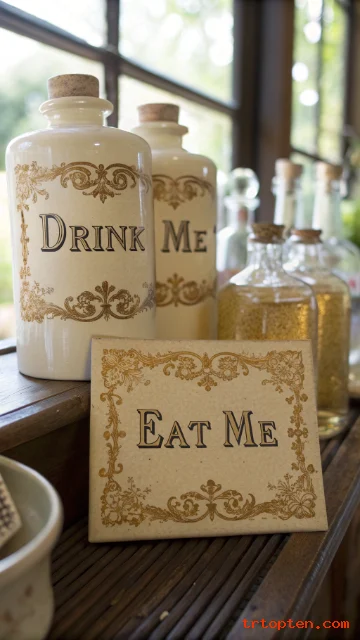
Print or hand-draw “Drink Me” and “Eat Me” labels in vintage-style fonts to place on beverage bottles, cake stands, or snack jars. Use aged paper or kraft paper to print these labels, then age them further with tea staining for an authentic look. Cut them into decorative shapes with rounded or scalloped edges.
Attach the labels to glass bottles, jars, and containers around your party space or decorative area. Vintage-style typography and color choices make these labels feel authentic to the story. You can customize the text to fit your specific needs or create variations like “Bake Me” or “Sip Me.”
These simple labels transform ordinary items into thematic decorations instantly. Display them on a dessert table, beverage station, or shelf arrangement to enhance the entire Alice in Wonderland atmosphere. Making a set of ten labels takes twenty minutes and costs nothing if you print them yourself.
Clock With No Numbers Wall Art
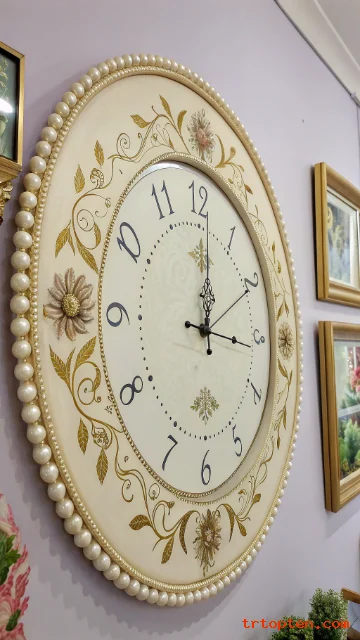
A clock showing no hands or numbers directly references the time-obsessed White Rabbit from the story. Cut a circle from foam board or cardboard and paint it white or gold. Leave the center completely blank where numbers would normally appear to capture the nonsensical nature of Wonderland time.
Add decorative elements around the edge like floral designs, pearls, or metallic accents using paint, beads, or adhesive materials. Hang the clock high on a wall where guests can see it clearly. The absurd clock without time markings becomes a conversation piece and constant reminder of Wonderland’s topsy-turvy logic.
Install this wall art in a hallway, office space, or bedroom to add whimsy without requiring an actual working timepiece. Making the design takes about forty-five minutes. This decoration costs less than five dollars if you use basic craft supplies you already own.
Striped Stockings as Vase Covers

Roll bright striped socks, stockings, or fabric into cylinders that cover ordinary glass vases and jars. Choose colors that match your Alice in Wonderland palette like red and white stripes or multicolored patterns. Secure the fabric with elastic bands, tape, or thin string wound around the middle.
Fill these dressed-up vases with flowers, branches, or dried grasses to create beautiful table arrangements. The playful striped pattern immediately suggests the story’s whimsical nature. Mix and match different stripe patterns and colors to create visual interest.
Group several stockings-covered vases together for a dynamic display on shelves, tables, or windowsills. Each vase takes five minutes to dress up with fabric. This decoration idea lets you completely transform your space without buying new vases.
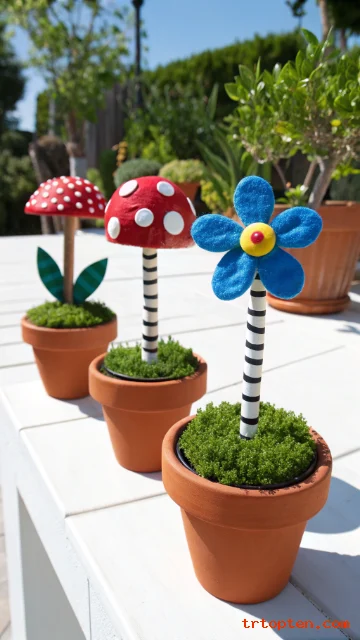
Mushroom Stools From Tree Stumps
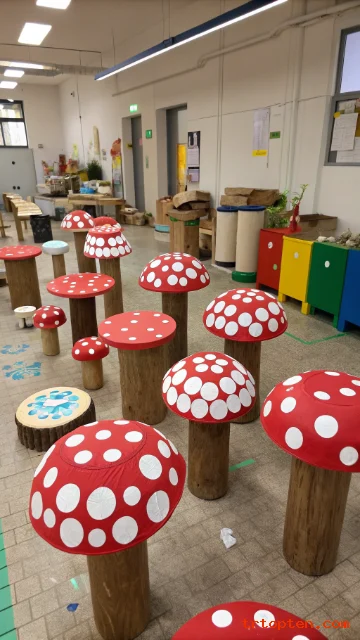
Cut painted tree stumps or cardboard rolls into mushroom shapes that scatter throughout your space like Wonderland’s magical mushrooms. Paint them in bright reds, whites, and spots using acrylic paints. Make some round and short, others tall and thin to create variety.
Use these painted mushrooms as side tables, decorative props, or floor arrangements in rooms themed to Alice in Wonderland. If you work with actual wood, seal them to prevent splintering and damage. Cardboard versions work just as well for temporary party setups.
Cluster these mushrooms in corners, under side tables, or near seating areas to create magical pockets throughout your space. Making a set of three takes about two hours. The sturdy design means you can use them year-round in different themed rooms.
Mad Hatter Tea Party Bunting
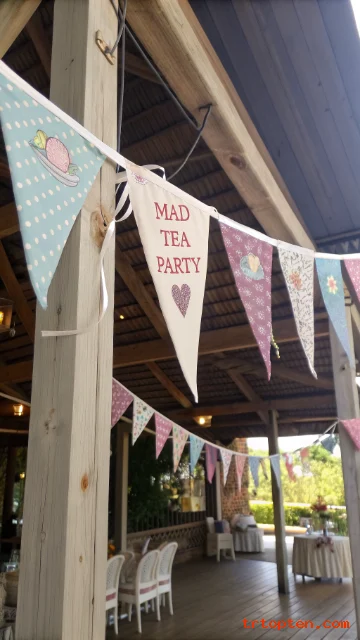
Create custom bunting that spells out party messages or displays the mad hatter aesthetic across doorways and outdoor spaces. Cut triangular pennants from colorful fabric or cardstock printed with teacup patterns, playing cards, or fun phrases. Sew or glue them onto twine or ribbon for easy installation.
Mix solid colors with patterned pieces to create visual rhythm and interest. Include numbers like “1,2,3” or clock faces to reference time and counting themes from the story. Stagger the pennant sizes to add dimension and movement.
Hang this bunting above party tables, along fence lines, or across bedroom walls to establish the festive Alice theme. Making fifteen pennants takes about one hour. The reversible design means you can display different messages by simply flipping the bunting.
Queen of Hearts Tart Pyramid
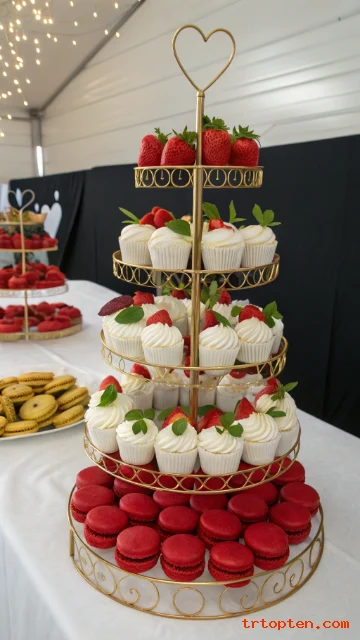
Stack red and white macarons, cupcakes, or felt balls into a pyramid arrangement that references the Queen’s famous tarts. Use tiered cake stands, boxes, or platforms to create multiple levels. Paint or glue white dots on red items to match the playing card aesthetic.
Make this centerpiece entirely from crafted materials if you’re decorating long-term. Use red and white balloons arranged in pyramid formation for a larger-than-life version. The simple geometry of a pyramid creates an instantly recognizable shape.
Display this tart pyramid at the entrance to your party space or on a prominent table. The structure creates height and draws eyes upward in your room arrangement. Making a fabric or craft version takes about one hour.
Vintage Alice Portrait Gallery Wall
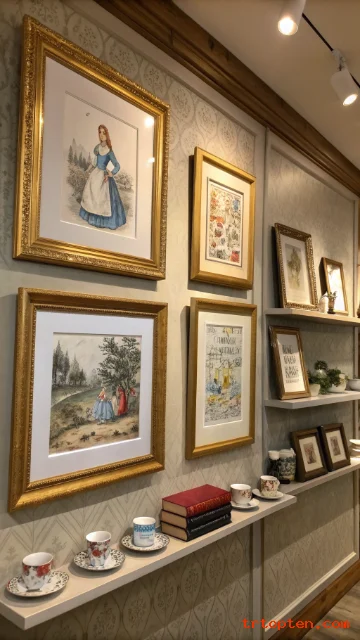
Print classic John Tenniel illustrations from Alice in Wonderland or create your own Alice-inspired artwork on a dedicated gallery wall. Frame them in vintage frames of various sizes and finishes like gold, silver, and ornate wood. Mix full-page illustrations with close-up character details.
Arrange the frames in a salon-style layout that covers a significant wall area. Add small floating shelves with teacups, books, or tiny figurines between framed pieces. The gallery approach creates a sophisticated, curated feel while celebrating the story.
This decoration works beautifully in bedrooms, offices, home libraries, or entryways. Printing and framing takes about two hours for a gallery of ten pieces. The finished wall becomes the showpiece of any room and sparks immediate conversations about the source material.
Oversized Playing Card Cutouts
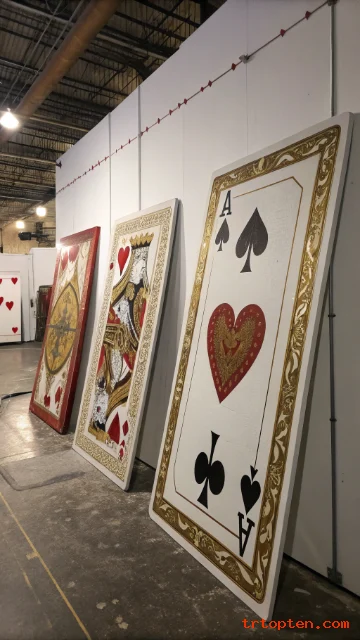
Cut or print playing cards at massive sizes using cardboard, foam board, or printed cardstock. Make them large enough to stand independently as floor decorations or lean against walls. Paint or print intricate details on each card to make them visually interesting from a distance.
Create a full deck of cards or focus on high-impact pieces like the Queen and Ace of Hearts. Use metallic paints, glitter, or special effects to make the cards glow under party lighting. Arrange them in formations that suggest the chaotic card scene from the story.
Position these giant cards around your space as photo backdrops or directional markers. They create a whimsical atmosphere while adding height and dimension to flat walls. Making three large cards takes about two hours.
Flower Crown and Wreath Arrangements
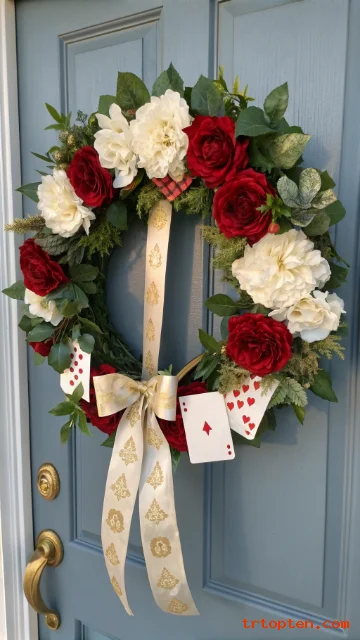
Craft flower crowns and wreaths inspired by the garden painting scene where the characters paint white roses red. Use silk flowers or fresh blooms in red, pink, and white combined with greenery and twine. Create crowns small enough to wear or wreaths large enough for wall display.
Mix real and artificial flowers depending on your decorating timeline and budget. Add playing card cutouts, small bells, or ribbon bows to the arrangement for extra detail. Use a floral foam base to secure all elements firmly.
Display these crown and wreath arrangements on walls, doorways, or as table centerpieces. Wearing flower crowns at a themed party adds an interactive element to your decoration scheme. Making a flower crown takes thirty minutes.
Caterpillar Pillow Lineup
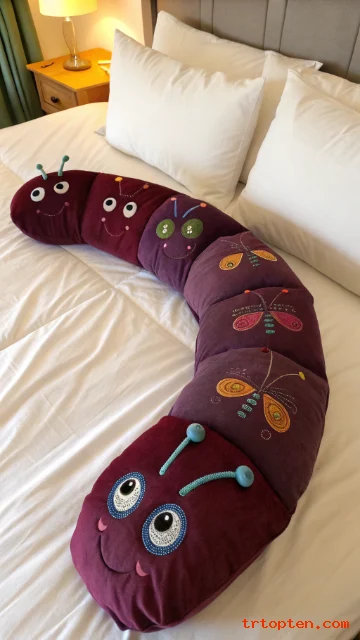
Stack and arrange colorful round pillows in a caterpillar formation that references the hookah-smoking caterpillar character. Use pillows in jewel tones like emerald, sapphire, and amethyst. Paint or attach faces to the front pillow to create the caterpillar’s head.
Arrange the pillows in a gentle curve along a bed, sofa, or reading nook. The soft, squishy texture creates comfort while adding playful visual interest. You can make pillows from scratch using fabric and stuffing if you enjoy sewing projects.
This decoration serves the dual purpose of adding comfort and establishing the Alice in Wonderland theme in bedrooms. Making the pillow arrangement takes about one hour once you have materials. The setup invites guests to sit and enjoy the whimsical seating.
Painted Doorway Frame Arch
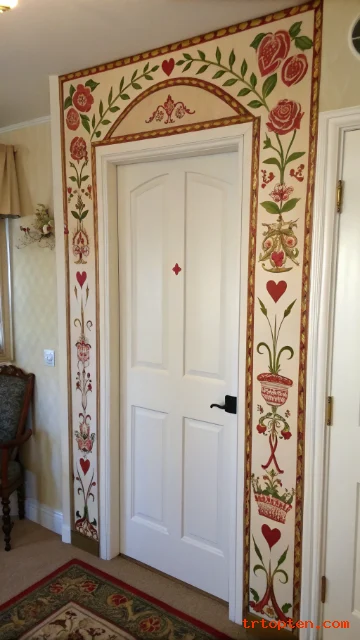
Paint an elaborate frame or arch around a doorway to create an entrance that literally frames your Alice in Wonderland world. Use exterior paint suitable for your door material. Paint intricate designs, roses, playing cards, or teacups around the door frame.
Create perspective with the painted design that suggests depth and movement. Include small details like caterpillars, mushrooms, or pocket watches within the larger frame composition. Use multiple colors that complement your overall decoration scheme.
This dramatic painted entrance creates an instant threshold between the normal world and Wonderland when guests cross through. The project takes about four hours but creates permanent decoration that needs repainting only every few years. Professional painters can complete this in one day.
Hanging Pocket Watch Props
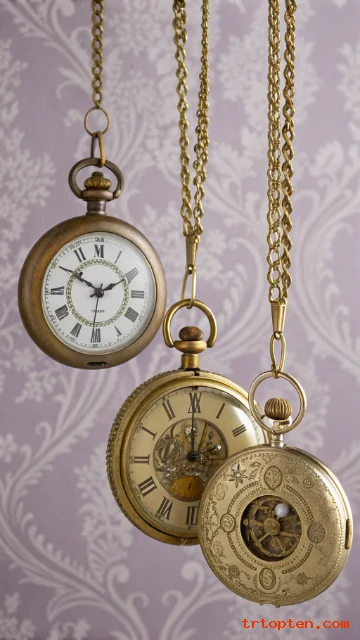
Create oversized pocket watches from cardboard, foam, or paper mache that hang from ceilings or walls. Paint them gold or silver and add intricate clock face details. Include dangling chains made from twine, ribbon, or craft cord.
Make some watches show traditional times while others display impossible times like “All Hours” or “No Time.” Paint Roman numerals or decorated numbers around the edges. The asymmetrical hanging creates movement and visual interest.
Hang these props at varying heights throughout your space to establish the time-obsessed theme. Guests will immediately connect these watches to the White Rabbit character. Making three watches takes about two hours.
Topiary and Garden Sculptures
Create artistic topiaries using foam, branches, and greenery that suggest the Wonderland garden aesthetic. Sculpt mushroom and flower shapes from spray foam painted in bright colors. Arrange them in decorative pots alongside real or silk plants.
Use these garden sculptures outdoors on patios or indoors on large shelves and floor spaces. The three-dimensional nature creates impact even in large rooms. Mix real living plants with your painted foam creations for a balanced, organic feel.
Position these sculptures near seating areas or entrances where they frame the space. Making a single topiary sculpture takes about one hour. The durable foam construction means your sculptures last multiple seasons.
Tablecloth and Runner Stencil Designs
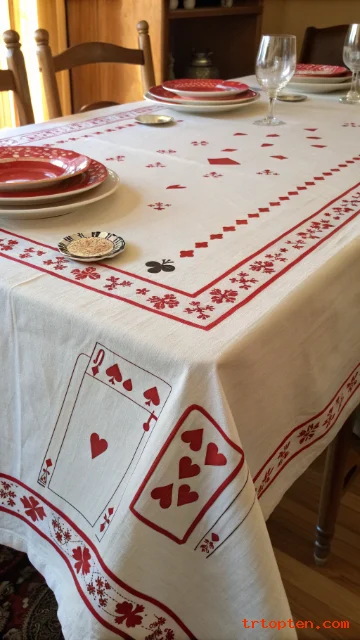
Stencil or hand-paint custom designs directly onto plain white or colored tablecloths and runners. Use stencils of teacups, playing cards, mushrooms, or quotes from the story. Create an all-over pattern or a border design along the edges.
Choose paint colors that coordinate with your overall decoration scheme. Test paint on a small area first to ensure it works well with your fabric type. Fabric paint allows you to wash and reuse decorated tablecloths for years.
Spread these custom tablecloths across tables at parties or daily use in your dining area. The painted surface immediately signals the Alice in Wonderland theme to anyone sitting down for meals. Painting a full-size tablecloth takes about two hours.
Floating Teacup Shelves
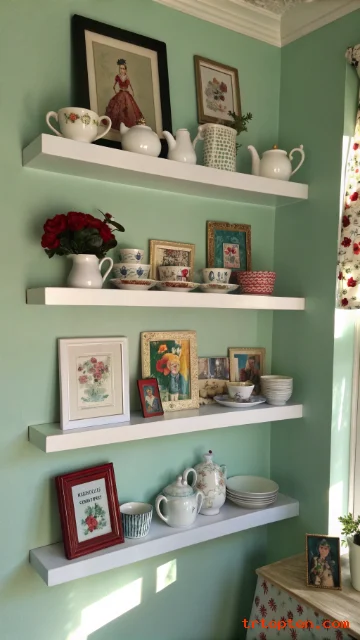
Mount floating shelves shaped like teacups or arrange regular shelves to display a collection of Alice in Wonderland items. Hang them at varying heights to create visual movement. Fill them with books, figurines, teacups, and decorative objects from the story.
Create custom teacup-shaped shelves from plywood if you have basic carpentry skills. Otherwise, standard floating shelves work perfectly when arranged thoughtfully. Include vintage books, ceramic pieces, and toys that reference the story.
This functional decoration combines organization with display in a beautiful way. The shelves work in bedrooms, libraries, or anywhere you want to showcase your collection. Installing three shelves takes about two hours.
Rabbit Hole Entrance Tunnel
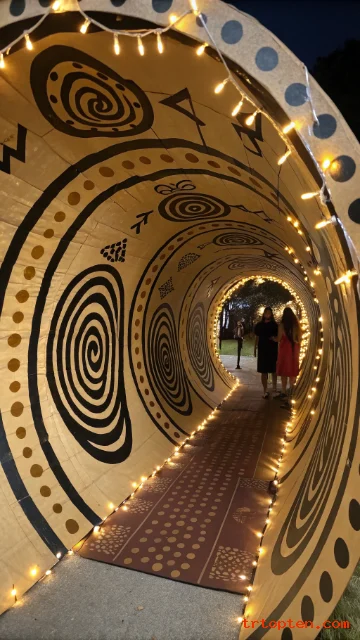
Build a tunnel entrance decorated to look like falling down the rabbit hole. Use cardboard tubes, fabric, and paint to create a spiral or swirling effect. Paint the interior with colors that suggest motion and descent into another world.
Position the tunnel as the entrance to your party space or decorated room. Guests pass through the tunnel to literally enter Wonderland. String lights inside the tunnel create a magical glow that builds anticipation.
This dramatic entrance immediately immerses visitors in the Alice theme. Building a simple tube tunnel takes about three hours. The memorable experience makes this project worthwhile for themed parties.
Drink Station With Themed Glassware
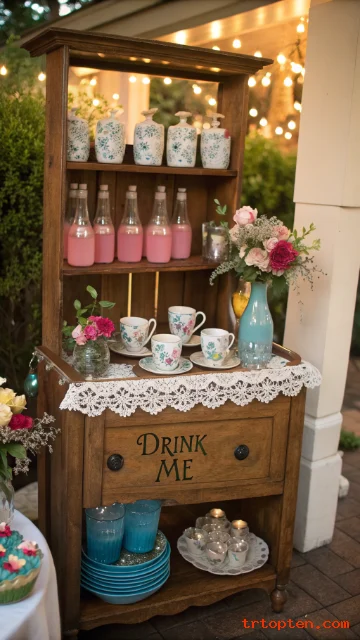
Set up a beverage station using teacups, mismatched glasses, and vintage bottles that matches the Alice in Wonderland aesthetic. Paint glass jars with “Drink Me” labels for punch or juice. Fill them with colorful beverages that glow under party lighting.
Use teacups as serving vessels for hot or cold beverages depending on your party timing. Arrange the station with small tables, decorative trays, and fresh flowers in between bottles. Create name cards for each drink with themed names like “Rabbit’s Special Brew” or “Wonderland Punch.”
This functional decoration serves guests while maintaining your theme throughout the party. Setting up the station takes about thirty minutes once you have pieces in place. The colorful glassware and beverages photograph beautifully for social media.
Printed Wallpaper Murals
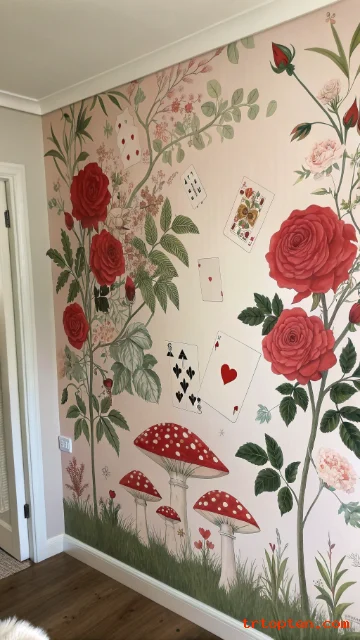
Print oversized wallpaper murals featuring Alice in Wonderland scenes on peel-and-stick material. Create a garden scene with roses, mushrooms, and card-playing characters. Apply them to accent walls to instantly transform a room.
Use your printer and photo editing software to create custom scenes that match your color palette. Peel-and-stick wallpaper removes cleanly if you change your mind later. Layer multiple smaller prints to create your own custom mural.
This dramatic transformation works perfectly for temporary party setups or permanent room redesigns. Printing and applying murals takes about two hours for a large accent wall. The finished effect looks professional and creates an instant focal point.
Card Soldier Standees
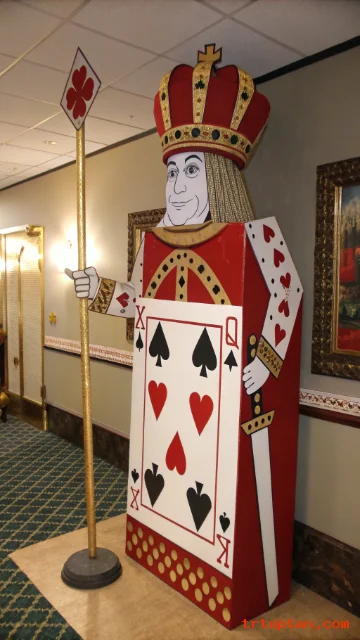
Create life-sized cardboard cutouts of card soldiers based on the Queen’s guards. Paint them in red, black, and white playing card patterns. Add dimensional elements like weapons, hats, or decorative armor using additional cardboard layers.
These standees work as photo props or standalone decorations positioned throughout your space. Paint details with acrylics or markers for intricate designs. Group several together to suggest the Queen’s army marching through your room.
Position standees at entryways, in corners, or flanking important areas like doorways. The playful soldier decorations add personality and create opportunities for fun photos. Making a single standee takes about two hours.
Memory Jar Decoration and Guest Activity
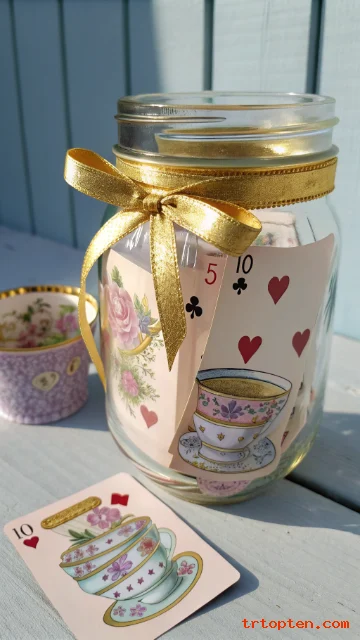
Create a decorated jar where guests write favorite Alice in Wonderland moments or nonsensical quotes. Decorate the jar with stickers, paint, ribbon, and playing card cutouts that match your theme. Fill it gradually throughout your party or event.
Use a clear glass jar so the colorful guest notes create visual interest. Create decorative cards or tags in various colors that guests use for writing. Design a label for the jar that matches your overall aesthetic.
This interactive decoration serves as both visual element and memento from your event. Display the jar prominently at your party entrance or on a main table. The project costs less than five dollars and takes thirty minutes to prepare.
Frequently Asked Questions About DIY Alice in Wonderland Decorations
What supplies do I need to start creating Alice in Wonderland decorations?
Basic supplies include acrylic paint, paintbrushes, cardboard or craft paper, scissors, glue gun, ribbon, twine, and foam board. Most decorations use items you can source from thrift stores or repurpose from your home.
Starting with these fundamentals lets you create most of the decoration ideas without special purchases. Building a craft supply kit costs under thirty dollars.
Can I make these decorations on a budget?
Absolutely, budget-friendly decoration creation is entirely possible with these projects. Shop thrift stores for teacups, dishes, and vintage items. Print designs at home instead of buying pre-made decorations.
Collect materials like cardboard, paper, and fabric scraps from around your house. The total cost for multiple decorations typically stays under fifty dollars even with new supplies.
How long do these decorations last?
Cardboard and paper decorations last several months to a year with proper storage. Painted wooden items last for years when sealed appropriately. Fabric decorations stay beautiful indefinitely if stored correctly away from moisture and direct sunlight.
Taking care during storage ensures you reuse decorations for multiple parties or seasons.
What age group enjoys Alice in Wonderland decorations most?
Children aged three through twelve especially love the whimsical aesthetic and interactive elements. Teenagers and young adults appreciate the sophisticated literary reference and nostalgic appeal.
Adults enjoy recreating a beloved classic through creative projects. The theme works across all age groups when you adjust decoration style and placement.
Can I combine Alice in Wonderland decorations with other themes?
Yes, the whimsical nature blends well with other aesthetics like Victorian, steampunk, or vintage styles. Combine Alice decorations with seasonal elements for holiday parties.
Mix in fantasy or woodland themes for a cohesive look. The playing cards and teacups work in nearly any creative environment.
Where should I display these decorations in my home?
Bedrooms work perfectly for creating an immersive themed space that sparks imagination. Entryways make impressive first impressions when guests see your dedication to the theme.
Party spaces benefit from concentrated decoration that fully transforms the environment. Shelving areas and walls showcase your collection beautifully throughout the year.
How can I make decorations that are safe for children?
Use non-toxic acrylic paints and avoid small choking hazards like beads on low-hanging decorations. Secure all hanging decorations firmly so they cannot fall on sleeping children.
Avoid sharp edges on cardboard cutouts by taping or sanding them smooth. Test all materials with your specific children before displaying them.
What’s the best way to store decorations between uses?
Store items in labeled plastic bins that protect from moisture and dust. Keep painted pieces flat or upright depending on their construction.
Wrap fragile items like painted teacups in tissue paper for protection. Store in cool, dry closets away from direct heat or humidity that causes warping.
Can these decorations work for outdoor spaces?
Outdoor versions require weather-resistant paint and materials that withstand moisture and temperature changes. Use exterior-grade paint on wooden or cardboard decorations.
Bring delicate items inside during rain or harsh weather. Outdoor teacup displays work beautifully on covered porches or under gazebos.
How do I photograph these decorations for social media?
Use natural window lighting during daytime for the best color representation. Include people wearing flower crowns or posing near standees for scale and engagement.
Photograph details close-up to show painting techniques and craftsmanship. Use multiple angles including overhead shots to show the entire decorated space.
DIY Alice in Wonderland Decorations Transform Your Space Into Pure Magic
Creating your own Alice in Wonderland decorations brings personal satisfaction and unlimited customization possibilities that store-bought items cannot match.
These twenty-six ideas provide starting points for your imagination while remaining practical to build with basic supplies and tools.
The beauty of handmade decorations lies in the flexibility to match your exact color preferences, available space, and creative vision.