Halloween nail designs turn your manicure into part of your costume and mood. You can show your love for spooky season every time you move your hands.
This guide walks through 30 halloween nail designs with clear descriptions and style tips. You can pick one look or mix details from a few designs for your own custom set.
Classic Black Cat Silhouette Nails
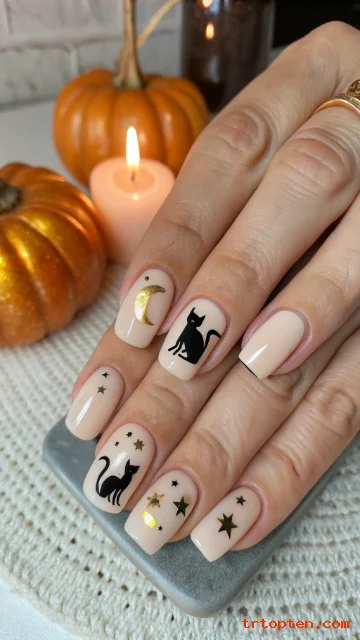
Black cat nails feel timeless and spooky in a soft way. They work with costumes, casual outfits, and even office looks.
Start with a nude or soft beige base to keep the design clean and modern. Then add simple black cat silhouettes on one or two accent nails.
You can place a full cat on the ring finger and a tiny tail or paw on the thumb. Use a thin nail art brush or a cat decal if freehand feels hard.
Short square nails look sleek with this design, but almond nails give the cats a graceful feel. Seal the art with a glossy top coat so the black cats stay sharp.
For extra charm, add small gold stars or a pale moon shape behind one cat. That small detail makes the nails feel like a tiny Halloween scene.
This design pairs well with cozy sweaters, trench coats, and black boots, so it fits the whole spooky season.
Dripping Blood Red French Tips
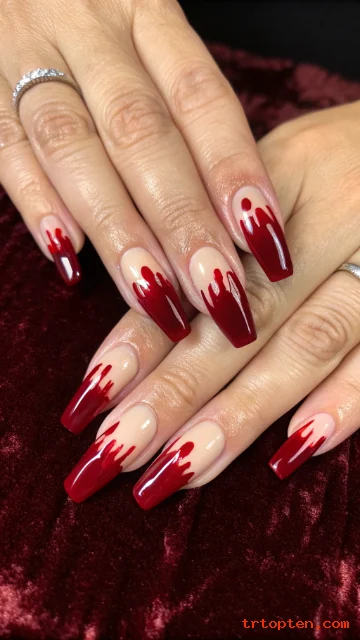
Dripping blood nails give instant horror movie vibes. The look is striking but still easy to achieve.
Paint a sheer nude or pale pink base to mimic natural nails. Then create deep red French tips with “drip” lines that reach down toward the cuticle.
Use a dotting tool to place small blobs of red polish along the tip line. Drag each blob upward or downward to form smooth drips that look like fresh blood.
A high-shine top coat makes the red look even richer and more dramatic. Square or coffin shapes work well because they give more room for the drip effect.
You can keep all nails the same or make just two accent nails with heavy drips. Mix a darker wine red with a bright crimson for extra depth.
This design looks amazing with vampire costumes, gothic outfits, and bold red lipstick.
Cute Jack-O’-Lantern Pumpkin Nails

Jack-o’-lantern nails bring classic Halloween fun to your fingertips. They feel playful and family-friendly.
Start with a bright pumpkin orange base on all nails. Then paint black jack-o’-lantern faces on one or two nails per hand.
Use simple triangle eyes and a toothy grin for a cartoon style. A fine brush helps keep the lines crisp and even.
You can vary each pumpkin face so every nail has its own personality. Try one spooky face, one silly face, and one sleepy face.
Add green stems or tiny vine curls at the cuticle area for extra pumpkin detail. A matte top coat gives the orange a real pumpkin-skin look.
This design looks great on both short and long nails, so it suits many hands.
Ghostly White French Tips

Ghost nails give a cute, subtle twist on a standard French manicure. They feel soft, simple, and still very Halloween-ready.
Paint a milky sheer base to keep the nails fresh and clean. Then replace classic white tips with rounded little ghost shapes.
Create each ghost by drawing a wavy white tip that drops lower in the center. Add two tiny black dots for eyes and a small oval for a mouth.
Keep the ghosts small and minimal so the design stays chic. This looks lovely on almond or rounded nails.
You can add one ghost accent per hand if you like a more quiet design. The rest of the nails can have plain white tips for balance.
A glossy top coat keeps the ghosts looking smooth and polished.
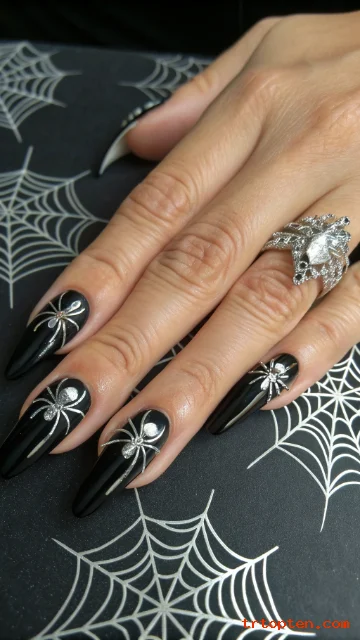
Silver Spiderweb Accent Nails
Spiderweb nails bring instant Halloween drama with very little effort. The design can stay minimal or become detailed art.
Start with a deep black or midnight blue base on all nails. Then choose one or two nails per hand for silver spiderwebs.
Use a thin striping brush and metallic silver polish to draw a small center point near a corner. Pull straight lines outward like sun rays, then add curved lines between them to form a web.
Work slowly so each line stays thin and even. A glittery silver shade catches the light and makes the webs sparkle.
You can add a tiny rhinestone “spider” at the center of one web. That small gem makes the accent nail stand out even more.
This look fits long stiletto nails, but it also looks sharp on short shapes.
Haunted House Scene Nails
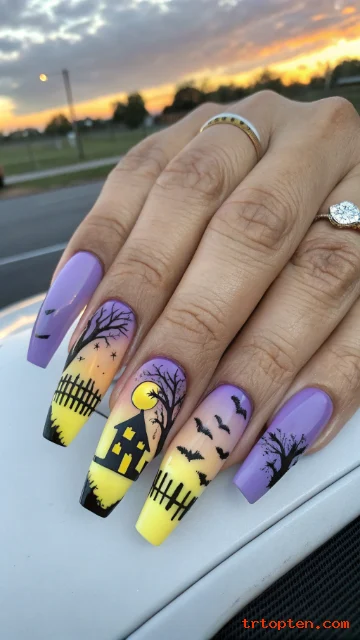
Haunted house nails turn your manicure into a tiny Halloween painting. They draw attention every time you move your hands.
Use a gradient sky as your base, with yellow at the cuticle and purple near the tips. This gives a spooky sunset effect.
On top of the gradient, paint black silhouettes of a crooked house, fence, and bare trees. Use very thin brushes to keep the details clean.
Place the main house on one feature nail, then let trees and bats spread onto nearby nails. This creates a full scene across the hand.
Keep some nails simpler with just bats or clouds so the set does not feel too busy. A matte top coat gives the sky a misty, eerie feel.
This design suits longer nails best so you have room for all the shapes.
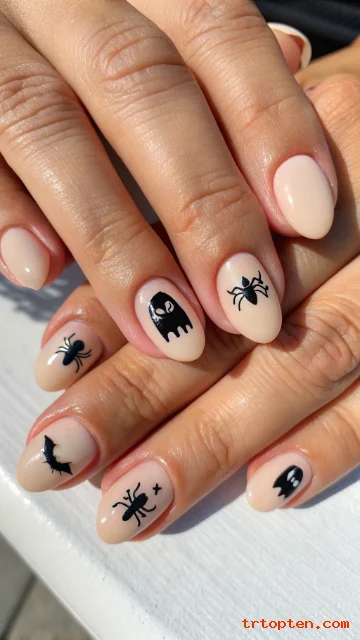
Mismatched Spooky Icons
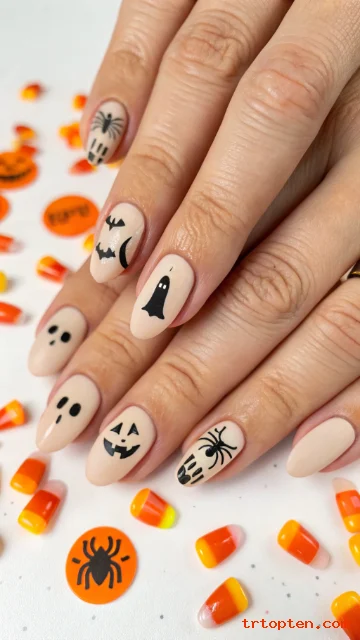
Mismatched icon nails feel fun and playful, like Halloween stickers on your fingertips. Each nail shows a different tiny symbol.
Pick a simple color palette like black, white, and orange to keep the set cohesive. Then draw one clear icon per nail.
Ideas include a bat, ghost, pumpkin, spider, skull, candy, and tiny bone. Keep each drawing simple, almost like a doodle.
Start with a neutral or pastel base if you want a softer look. For bolder style, go with a matte black base and bright icons.
You can hand-paint the icons or use nail stickers for quick application. Seal everything with a strong top coat so edges do not lift.
This design works well on short nails because the icons stay small and cute.
Glow-In-The-Dark Slime Nails

Glow-in-the-dark slime nails feel bold and playful, perfect for parties. The design looks wild under black light.
Start with a black or deep purple base to make the glow stand out. Use neon green glow polish to create slime drips from the cuticle downward.
Make the drips irregular in length and width so they look more natural. Use a dotting tool to start with a round blob, then pull it downward.
You can mix two shades of neon green for a layered slime effect. Let each layer dry before adding the next.
Charge the glow polish under a bright light so it shines in the dark. A clear top coat smooths any texture from multiple layers.
This set looks amazing with monster or mad scientist costumes.
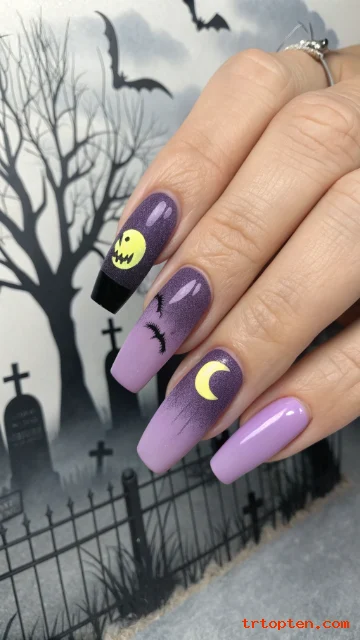
Witchy Moon And Stars Nails
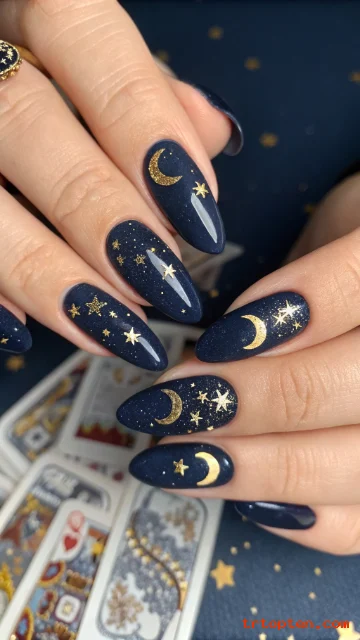
Moon and star nails give soft witchy energy without looking too scary. They feel mystical and pretty for the whole fall season.
Use a deep navy or inky black base to mimic the night sky. Add tiny gold or silver moons and star clusters across several nails.
You can paint a full crescent moon on the ring finger. Surround it with small stars on the same nail and on neighbors.
Metallic foil or nail stickers work well if freehand lines feel tricky. Keep shapes clean and minimal so the design looks refined.
Adding a touch of micro glitter over the base makes the sky shimmer. A glossy top coat completes the night-sky effect.
This design pairs well with crystal jewelry, velvet dresses, and classic witch hats.
Mummy Wrap Halloween Nails
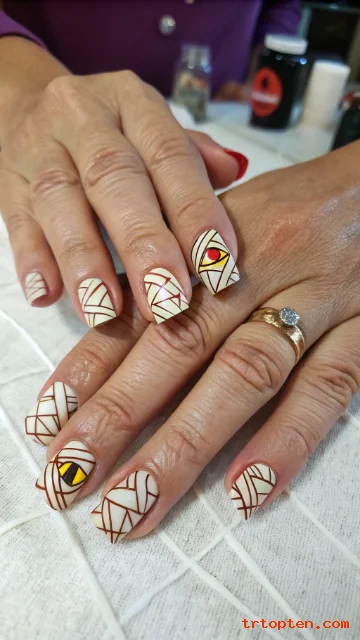
Mummy nails look fun and a bit creepy but still cute. The design mimics wrapped bandages.
Start with an off-white or pale cream base to suggest old fabric. Then add thin crisscrossing stripes of slightly darker beige or gray.
Leave small gaps between some stripes to show “skin” underneath. Paint tiny bloodshot eyes peeking out from one gap on an accent nail.
Square or short coffin nails work well for this look. The flat edges make the wrap pattern easier to draw.
You can keep most nails fully wrapped and give just one or two nails visible eyes. That balance keeps the manicure from feeling too busy.
A matte top coat makes the wraps look more like real cloth strips.
Vampire Fang French Tips

Vampire fang nails turn a classic French tip into something sharp and edgy. They suit gothic outfits and vampire costumes best.
Start with a sheer nude base on all nails. Then paint bright white triangles at the tips of the ring and middle fingers to form fangs.
Place the triangles so they point downward from the free edge toward the center. Outline each fang with thin black lines for definition.
Add a tiny drop of red at one fang tip to suggest blood. Keep the rest of the nails simple with soft white French tips.
This contrast keeps the manicure wearable but still dramatic. Use a glossy top coat so the fangs look shiny and sharp.
Almond or stiletto shapes enhance the fang effect even more.
Skeleton Bone Outline Nails
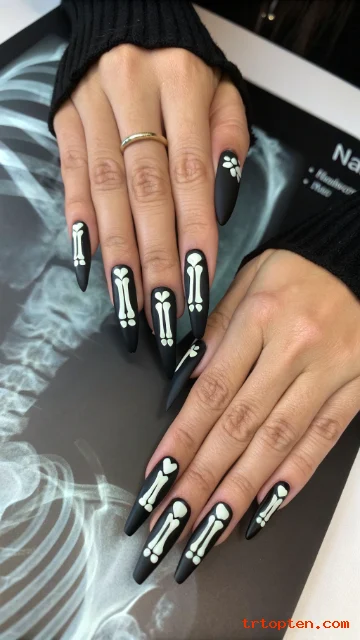
Skeleton nails give a cool, graphic look that fits many costumes. The design looks striking in photos and in person.
Use a black base coat on all nails for strong contrast. Then paint simple white bone shapes down the center of each nail.
You can create a “joint” in the middle by painting two small circles connected by straight lines. Keep the lines smooth and thin.
For a more complex design, paint small finger bone segments on each nail to mimic an X-ray. This works best on longer nails.
A matte top coat can give the bones a chalkboard look. Glossy top coat makes them pop more, so choose based on your style.
Pair these nails with skeleton costumes or black-and-white outfits.
Candy Corn Ombre Nails
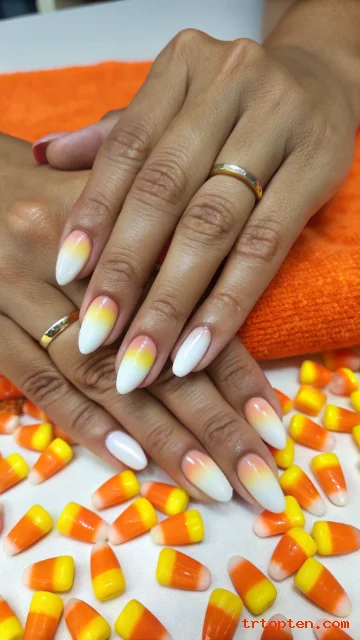
Candy corn ombre nails show your love for Halloween treats in a soft, stylish way. The design feels cheerful and bright.
Paint a smooth gradient that moves from white near the cuticle, to orange in the center, to yellow at the tip. Blend the shades with a sponge for a soft fade.
Keep the colors creamy and opaque for a true candy look. Use thin layers so the ombre transitions stay smooth.
You can give every nail the full gradient or choose a few accent nails with the effect. The rest can stay solid orange or white.
A glossy top coat makes the gradient look like real candy coating. Short round or oval nails look especially cute with this style.
This design pairs well with cozy sweaters and pumpkin patch outings.
Graveyard Silhouette Nails
Graveyard nails bring a moody, gothic twist to your manicure. They create a full story across your hands.
Start with a rich purple or dark teal gradient sky. Blend in a bit of black at the tips to suggest nightfall.
On top of the base, paint small black grave markers, crosses, and a crooked fence along the free edge. Add a simple bare tree on one accent nail.
Place a pale white or yellow moon near a corner on one nail. Add a few small flying bat shapes for movement.
Keep the silhouettes solid and simple so they stand out. A matte top coat gives the scene a misty graveyard feel.
This set works best on medium to long nails so the details show clearly.
Dark Galaxy Witch Nails
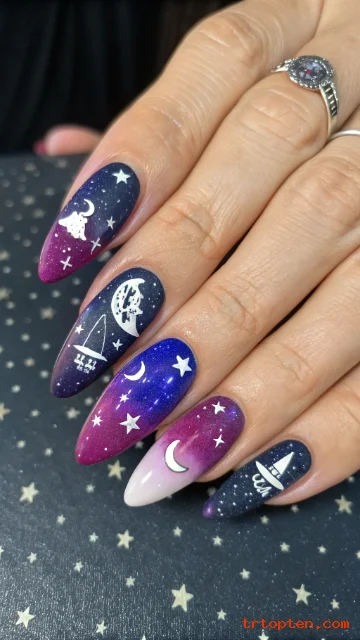
Galaxy witch nails mix cosmic art with spooky energy. They suit anyone who likes magic themes over gore.
Create a black or deep navy base on all nails. Use a sponge to dab on purple, blue, and magenta clouds.
Add small white dots to mimic distant stars. Then place a few slightly larger stars as cross shapes.
For a witchy twist, paint a tiny broom, pointed hat, or crystal silhouette on one or two nails. Metallic silver works nicely for these icons.
A fine layer of holographic glitter brings the galaxy to life. Seal everything with a glossy top coat so the colors blend smoothly.
This design shines under both daylight and party lights.
Poison Apple Glitter Nails

Poison apple nails bring fairytale horror to your manicure. The look is rich, shiny, and dramatic.
Use a dark red base with a jelly or glassy finish. Add a deeper wine shade at the tips for depth.
On accent nails, paint a dripping green skull pattern over the red, like the classic poison apple. Use bright neon or metallic green for strong contrast.
Create the skull by forming a round top, eye holes, and a drip-shaped jaw. Keep the edges soft so it looks like liquid.
Cover non-skull nails with fine red glitter to make them sparkle. The mix of shine and dark shades feels darkly glamorous.
A high-gloss top coat pulls the poison apple look together.
Plaid Pumpkin Patch Nails

Plaid pumpkin nails feel cozy and rustic, like a fall day at the farm. They mix classic patterns with Halloween icons.
Paint most nails in warm, soft shades like cream, beige, and tan. Then add an orange-and-black plaid pattern on one or two nails.
Use thin striping brushes to create horizontal and vertical lines. A mix of solid orange lines and semi-sheer black lines builds depth.
On a separate accent nail, paint a small orange pumpkin with a brown stem and green leaf. Keep it simple and rounded.
This set works well on shorter nails because the plaid and pumpkin stay compact. A glossy or satin top coat both suit the look.
Pair these nails with flannel shirts and boots for peak fall style.
Neon Toxic Drip Nails
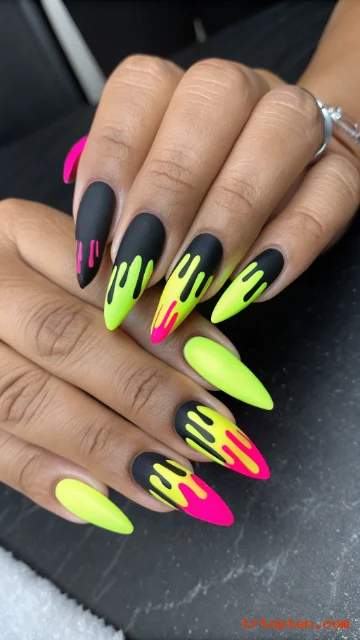
Neon toxic drip nails look bold, edgy, and perfect for a club or Halloween party. They stand out in any room.
Start with a flat matte black base on all nails. Then add neon drips in colors like lime green, electric yellow, and hot pink.
Place the drips at the cuticle area and let them run partway down the nail. Use a dotting tool and thin brush for control.
For an extra toxic vibe, mix two neon shades on one drip so they blend slightly. This gives a chemical reaction feel.
You can keep each nail one color or mix colors across the hand. A glossy top coat over just the drips creates a cool contrast with the matte base.
This set looks amazing on long coffin or stiletto shapes.
Pastel Cute Halloween Nails
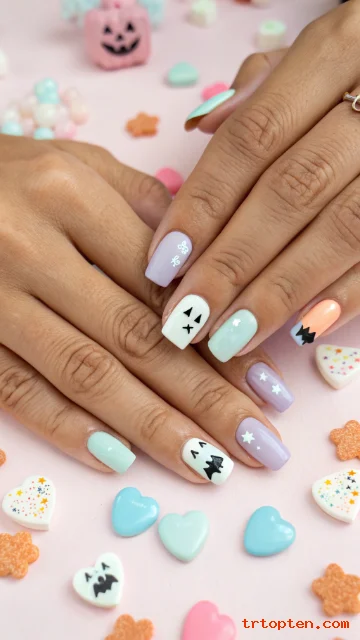
Pastel Halloween nails give a softer, more kawaii approach to spooky nails. They are perfect for those who avoid gore.
Choose a palette of pastel lilac, mint, baby blue, and peach for the base colors. Paint each nail a different shade.
On top of the pastels, add tiny white or black icons like hearts, ghosts, bats, and stars. Keep the lines thin and round so everything looks sweet.
You can give each ghost a cute blush and smiling face. That small detail changes the mood from scary to adorable.
Adding a light dusting of iridescent glitter ties the colors together. A glossy top coat keeps the nails candy-like and shiny.
This design works well on short, rounded nails for a soft finish.
Black Lace Gothic Nails
Black lace nails feel romantic and gothic at the same time. They look elegant enough for formal events.
Use a sheer nude or blush base on all nails. Then paint delicate black lace patterns along the tips and sides.
Create the lace by drawing small loops, scalloped edges, and tiny connected dots. A very thin brush or stamping plate helps a lot here.
Keep the lace concentrated near the free edge so the nails do not feel too heavy. Leave some clear space near the cuticle.
You can add tiny black roses or filigree accents on one or two nails. A matte top coat turns the lace into a velvety pattern.
This style looks especially striking on almond or oval nails.
Horror Movie Poster Nails
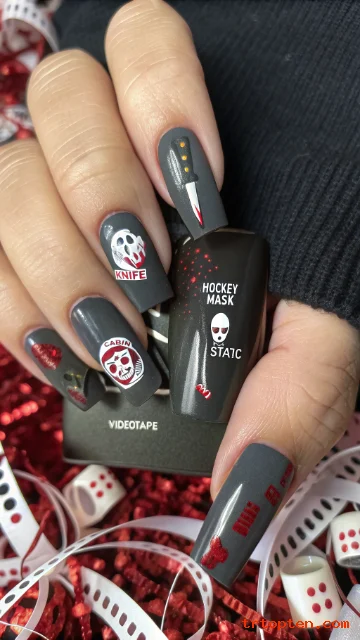
Horror movie nails show your love for classic scary films. Each nail can pay tribute to a different story.
Start with a black or dark gray base for a cinematic feel. Then choose key symbols instead of full faces to keep it simple.
Ideas include a knife silhouette, mask shape, cabin outline, TV static pattern, or old videotape icon. Paint each symbol in white and red for a bold look.
Keep the lines graphic, almost like logos. This helps the designs stay clear even on small nail spaces.
You can add movie title initials in tiny letters on one nail. A glossy top coat makes the set look like polished poster art.
This set fits medium to long square nails especially well.
Tarot Card Symbol Nails

Tarot nails give a mystical and stylish vibe. They match well with spiritual or witchy looks.
Paint a soft cream or pale gray base on each nail. Then add simple black line art inspired by tarot symbols.
Ideas include the sun, moon, star, cup, sword, wand, and pentacle. Keep each drawing clean and minimal like a small card icon.
You can frame one nail with a thin rectangular border to mimic an actual card. Add tiny roman numerals above or below the symbol.
A touch of gold foil on one or two nails adds magic and shine. Use a satin or glossy top coat based on your taste.
This design works nicely on both short and medium nails.
Cobweb Negative Space Nails

Negative space cobweb nails feel modern and chic. The design uses clear areas as part of the art.
Apply a clear or sheer nude base to all nails. Keep the natural nail visible under the design.
Use black or white polish to draw partial spiderwebs from one corner of each nail. Leave sections open so the web does not cover the whole nail.
The gaps create a floating, delicate look. This keeps the nails stylish instead of heavy.
You can tilt the webs in different directions on each finger for interest. A glossy top coat smooths the lines and adds shine.
Short to medium square nails make this look very fresh and clean.
Matte Black With Metallic Halloween Accents
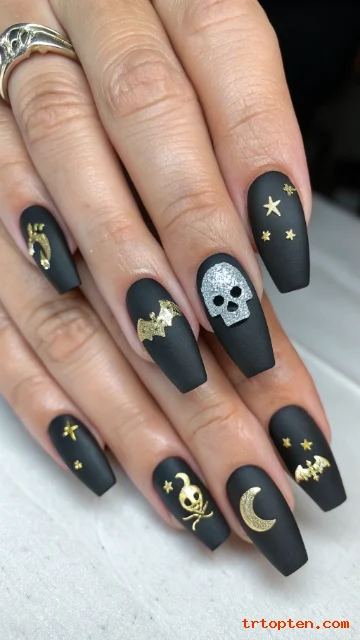
Matte black nails with metallic accents feel sleek and edgy. They are simple yet very striking.
Paint all nails matte black with a smooth, even coat. Let the matte top coat dry fully.
Then add small metallic designs in silver or gold. Ideas include tiny bats, moons, skulls, or spider icons near the cuticle.
Keep the shapes small so the set looks classy, not crowded. One or two accents per hand is enough.
The contrast between flat black and shiny metal catches the eye. This design fits both casual and dressy Halloween plans.
Coffin or almond shapes help the matte finish stand out even more.
3D Eyeball Accent Nails
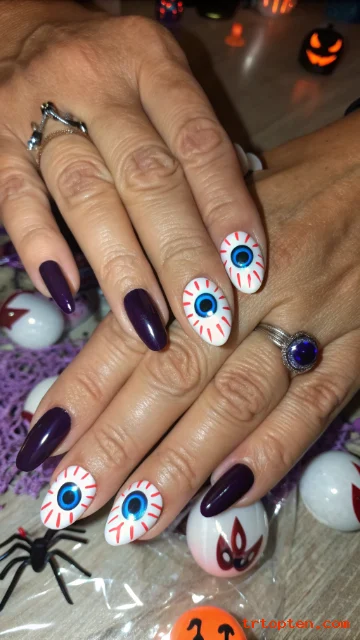
Eyeball nails give a creepy, playful pop to your manicure. They work best as one or two feature nails.
Paint most nails a simple black, dark green, or deep purple. Choose one nail on each hand for the eye design.
On the accent nail, paint a large white circle in the center. Add a colored iris, black pupil, and tiny white highlight dot.
Use fine red lines to create subtle veins around the white area. Keep the lines thin so they do not overpower the design.
For a stronger 3D effect, add a clear gel drop over the iris to dome it. This makes the eye look wet and realistic.
Balance the set with plain, shiny nails around the eyeball so the feature stands out.
Stitched Franken-Nails
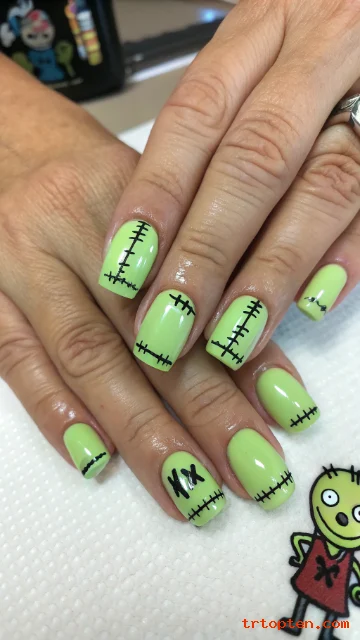
Franken-nails look like they were stitched together, just like a monster. They give a fun, cartoon horror vibe.
Use a bright green or pale mint base on all nails. This shade suggests classic monster skin.
Draw black stitch lines across each nail, either straight or slightly curved. Place short cross-lines along each main line to mimic thread.
You can add one or two silver “bolt” shapes near the cuticle on accent nails. These simple details push the Frankenstein theme.
Leave some nails plain green for balance. A glossy top coat keeps the colors bright and smooth.
This playful style suits short to medium nails really well.
Minimalist Micro Icon Nails
Micro icon nails are perfect if you want Halloween style but need a very subtle look. They suit office settings and everyday wear.
Paint all nails in a soft neutral shade like pale pink, beige, or light gray. Keep the finish smooth and even.
On just a few nails, place very tiny icons near the cuticle or tip. Think of a tiny black bat, minuscule ghost outline, or small spider head.
Use an ultra-fine brush or dotting tool for these details. Keep each icon just a few millimeters wide.
This style relies on small scale and clean space. It feels modern and polished.
Finish with a glossy top coat for a professional look.
Single Spider On A Thread Nails
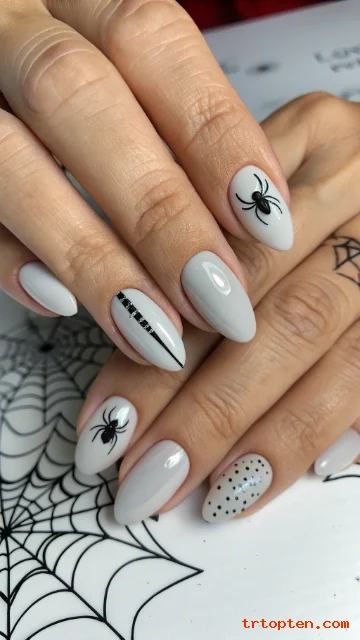
A single spider on a thread can make a big impact. The design stays simple but still spooky.
Paint all nails a flat cream, gray, or nude base. This lets the spider stand out clearly.
On one feature nail, draw a thin straight black line from the cuticle to the center. At the end of the line, paint a small black spider with a round body and eight tiny legs.
You can add a tiny white highlight dot on the body for dimension. Keep the rest of the nails clean with maybe one tiny dot or line for balance.
This design looks chic and not too busy. It works nicely for both short and long nails.
A glossy top coat keeps the thin line crisp and smooth.
Smoky Fog Marble Nails

Smoky marble nails look like haunted fog swirling over a dark landscape. They feel mysterious and elegant.
Start with a sheer gray base coat. Then use white, black, and darker gray polish to create a marbled pattern.
Drop small blobs of each color on the nail and swirl them lightly with a thin brush or toothpick. Aim for soft, cloudy shapes instead of sharp lines.
You can concentrate more white near the center and darker shades near the edges. This creates depth and movement.
A very fine shimmer added on top can mimic mist catching the light. Choose a thin glossy top coat to seal the design.
This look works beautifully on both short and long nails.
Classic Orange And Black Mix-And-Match Nails
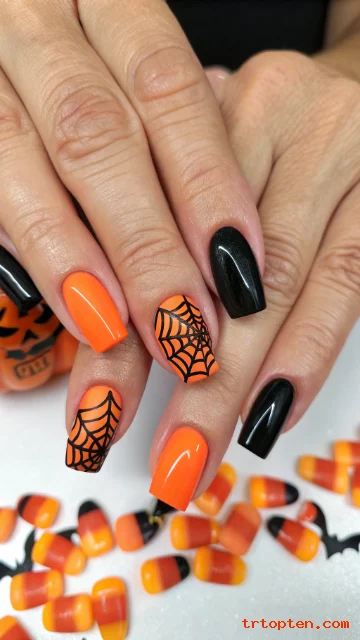
Orange and black mix-and-match nails bring pure classic Halloween energy. They are easy to customize at home.
Choose bright pumpkin orange and deep black as your main colors. Paint some nails fully orange and some fully black.
On each hand, pick one orange nail for a simple black bat or spiderweb. Pick one black nail for an orange pumpkin or stripe pattern.
Keep the icons bold and simple so they stay clear. A thin stripe or dot pattern on one nail adds extra interest.
You can play with different nail shapes, from short square to long coffin. The color combo works with them all.
Finish with a glossy top coat so the colors look rich and smooth.
How long do Halloween nail designs usually last?
Halloween nail designs can last 1–2 weeks on natural nails with regular polish. With gel polish, they often last 2–3 weeks.
Can I do detailed Halloween nail art on short nails?
Yes, short nails can hold simple icons like bats, ghosts, and tiny pumpkins. Focus on one small design per nail instead of full scenes.
What are the best colors for halloween nail designs?
Classic choices include black, orange, white, red, and purple. Neon green, silver, and gold also work well for modern or toxic looks.
Are press-on halloween nail designs a good option?
Press-on Halloween nails give fast, salon-level art with little effort. They are great if you want a themed look just for a weekend.
How can I make my Halloween manicure last longer?
Use a base coat, thin polish layers, and a strong top coat. Reapply top coat every few days and wear gloves for heavy cleaning.
Are these designs safe for kids?
Most designs are safe if you use non-toxic polish and remover. Choose simple, cute art like pumpkins or ghosts for small hands.
Can I mix different halloween nail designs in one set?
Yes, you can mix motifs as long as you keep a shared color palette. For example, combine ghosts, bats, and pumpkins using the same three colors.
When should I book a salon appointment for halloween nail art?
Book your appointment 5–10 days before Halloween so your nails still look fresh on the big day. Salons fill up fast, so plan early.
What if I am not good at hand-painting tiny details?
Use nail stickers, stamping plates, or simple dot and stripe designs. These tools create neat halloween nail designs with less effort.
Conclusion
Halloween nail designs let you carry the spirit of spooky season in every gesture. From soft ghosts and pastel pumpkins to bold blood drips and toxic slime, there is a look for every mood and skill level.
Use this list of 30 halloween nail designs as a menu of ideas, not strict rules. Mix colors, swap icons, and combine styles until your manicure feels like your perfect Halloween match.